Jumpcloud SSO (idp) to Keycloak (sp)
-
Jumpcloud SAML SSO to Keycloak
So I recently had the challenge of setting up SAML authentication from Jumpcloud to an existing application that uses Keycloak (v18.x) as its authentication provider. As Keycloak can also be used as an identity provider the configuration can be a bit confusing.
Keep in mind this quick tutorial assumes that you already have an existing Keycloak client which you are using to authenticate your service. Details of building a client are outside the scope of these instructions.
So lets get into it...
Variables and Standards
The first thing we need to do is decide on some common variables and standards for this tutorial. Moving forward when referencing user defined variable we will wrap them in moustaches e.g.
{{var_here}}- iDpID:
idp-jumpcloud-saml(ID Provider ID) - BaseURL:
keycloak.example.com(base url of your Keycloak instance) - RealmName:
myrealm(Keycloak realm name) - RealmClient:
myclient - SPID:
sp-jumpcloud-saml(Service Provider ID) - AppID:
mysaml(Display label of your Jumpcloud App) - SPAppUrl:
https://unogs.com
Configure Jumpcloud
- Login to the Jumpcloud admin interface
- Click on
SSO - Click the large green
+button - Click
Custom SAML App(bottom of page) - Fill out your display label with
{{JDSID}} - Fill in a description if you want
- Click on the
SSOTab - fill in
IdP Entity IDwith{{iDpID}} - fill in
SP Entity IDwith{{SPID}} - fill in
ACS URL:https://{{BaseURL}}/realms/{{RealmName}}/broker/{{iDpID}}/endpoint - select
SAMLSubjectNameID:asusername
- select
Signature AlgorithmasRSA-SHA256 - fil in
Login URLashttps://{{BaseURL}}/realms/{{RealmName}}/protocol/openid-connect/auth?response_type=code&client_id={{RealmClient}}&scope=openid&redirect_uri={{SPAppURL}}&kc_idp_hint={{SPID}}- note: if you want to see your previous keycloak login screen remove:
kc_idp_hint
- note: if you want to see your previous keycloak login screen remove:
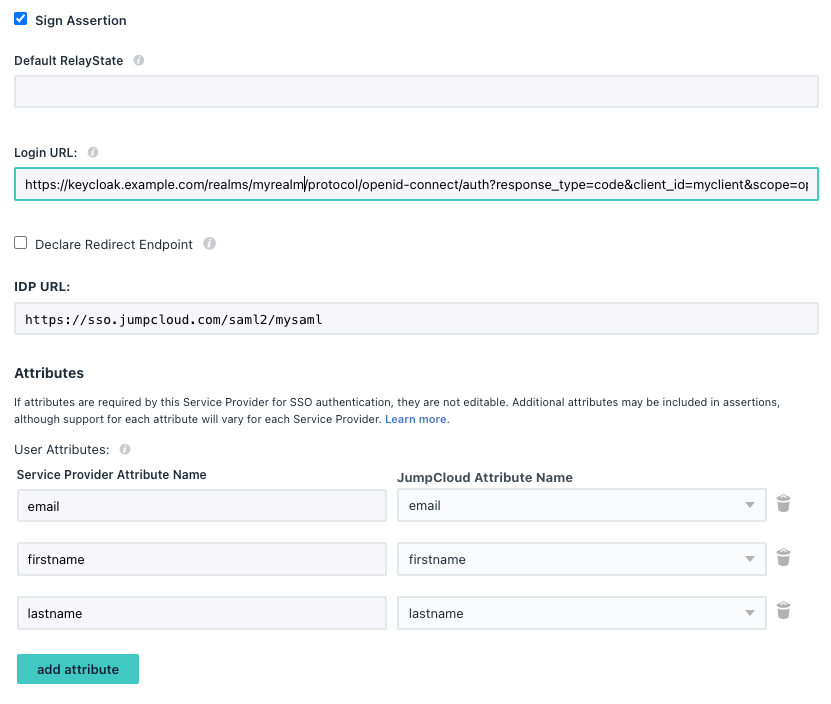
- tick
Sign Assertion - fill in
IDP URLwith{{APPID}} - Add the following
User Attributes:- value
emailselectemail - value
firstnameselectfirstname - value
lastnameselectlastname
- value
- e.g.
- click
activate - click on your newly created APP
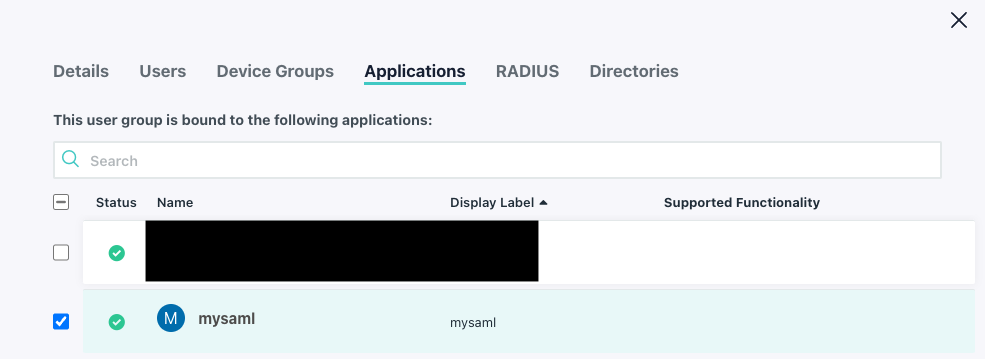
- click on the
User Groupstab and select the group you want to give the above app access to. - click on the
SSOtab - click
Export Metadata, an xml calledJumpCloud-saml.xmlfile will be saved locally
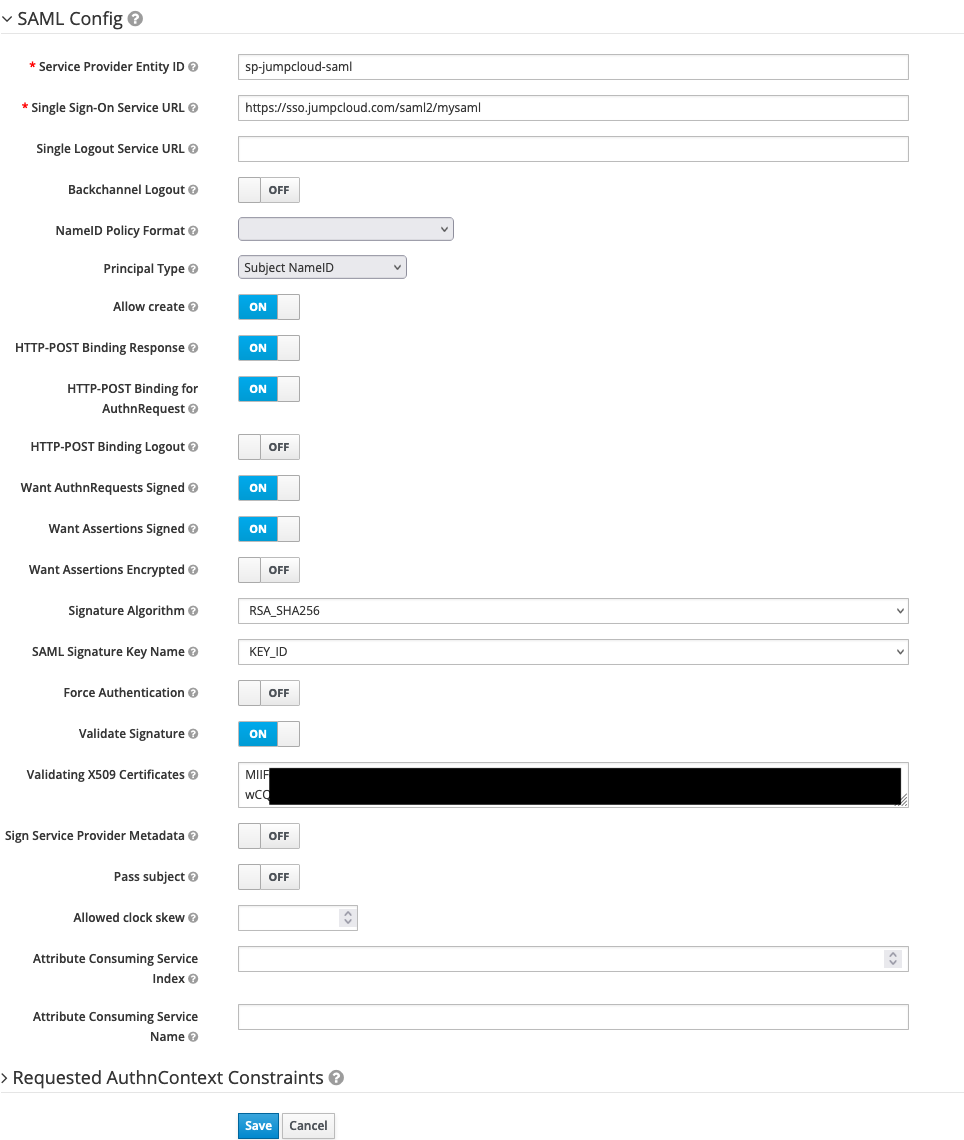
Configure Keycloak
Via the admin portal:
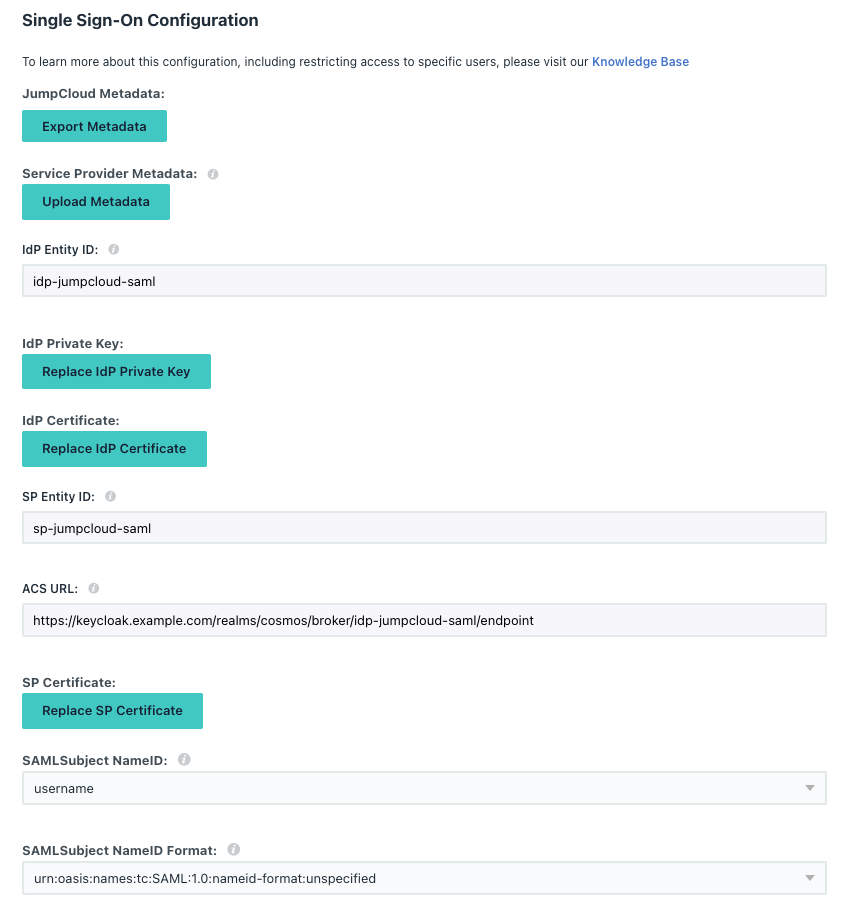
- click
Identity Providers - select
Add Providerand selectSAML v2.0 - change
Aliasto{{iDpID}} - e.g.
- change
Service Provider Entity IDto{{SPID}} - scroll to bottom of the page, select
Select Fileand chooseJumpCloud-saml.xml - click
Import - click
Save - e.g.
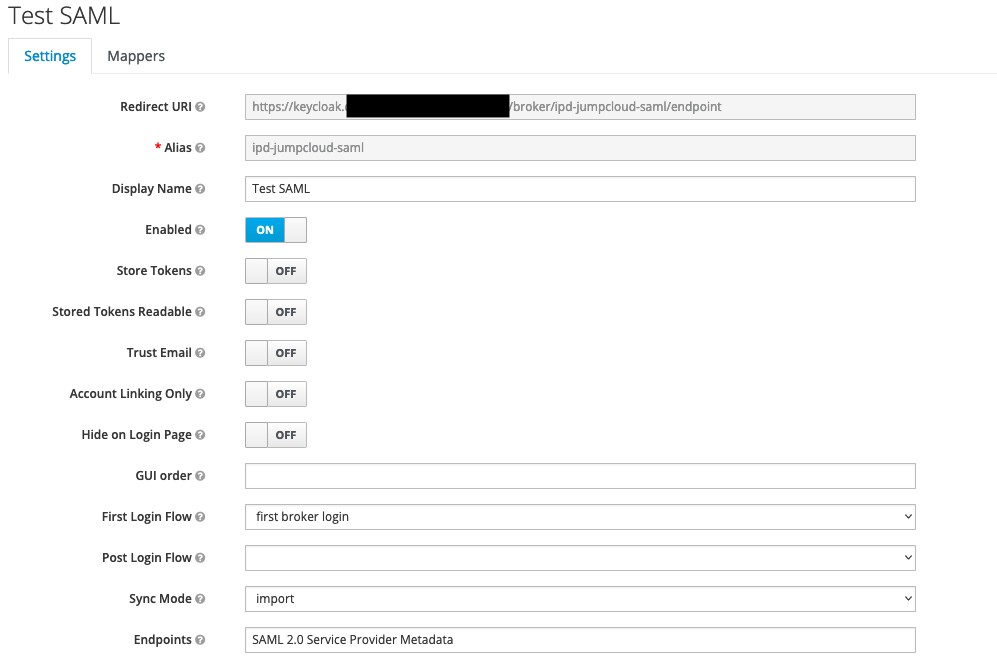
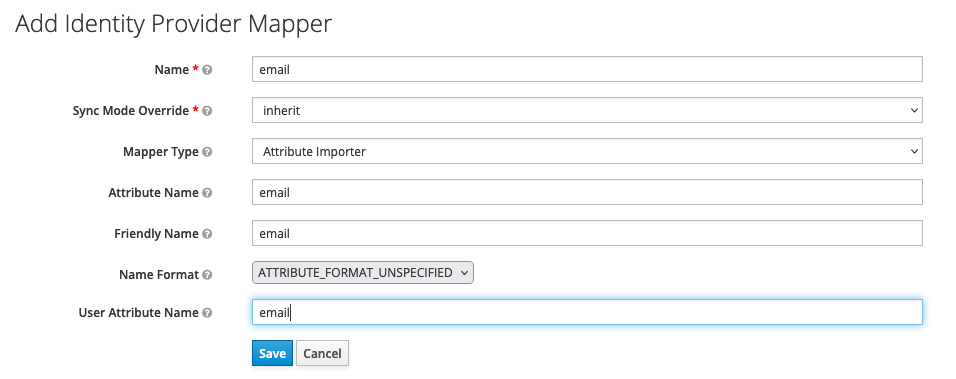
- go back into newly created provider and click the
Mapperstab - do the following for email, firstname and lastname
- click
create - give it a name
- change Mapper type to attribute importer
- fill in
Attribute Nameto type (email, firstname, lastname) - fill in
Friendly Nameto type (email, firstname, lastname) - select
ATTRIBUTE_FORMAT_UNSPECIFIED - fill in
User Attribute Namekctype (email,firstName,lastName)
- click
Wrap UP
If everything went as planned, the above configuration should allow your users to click on a new app in their jumpcloud console and it will automatically login via your existing client. For new users this configuration should also automatically populate user details in the JWT.
If you have any questions or anything doesn't work as expected feel free to email me at admin@unogs.com
- iDpID:
-
Mapping Groups from Jumpcloud
In the above post we set up Jumpcloud SAML SSO auth to use Keycloak as the SP.
In addition, it is sometimes helpful to include your jumpcloud groups in the SAML token. The following instructions should help enable this.Configure Jumpcloud
- start by configuring your group to use the SSO App you created for SAML
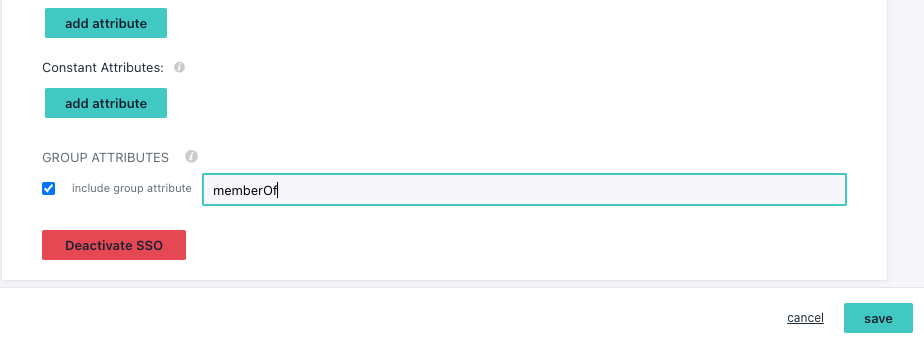
- Now update your SAML app to include group information:
- Go to your SSO App
- click on the SSO Tab and scroll to the bottom
- tick the box for
Group Attributes - give it a name like
memberOf(can be any name but you will need this for keycloak) - click
save
Configure Keycloak
- Open Keycloak admin portal for your realm
- Click on
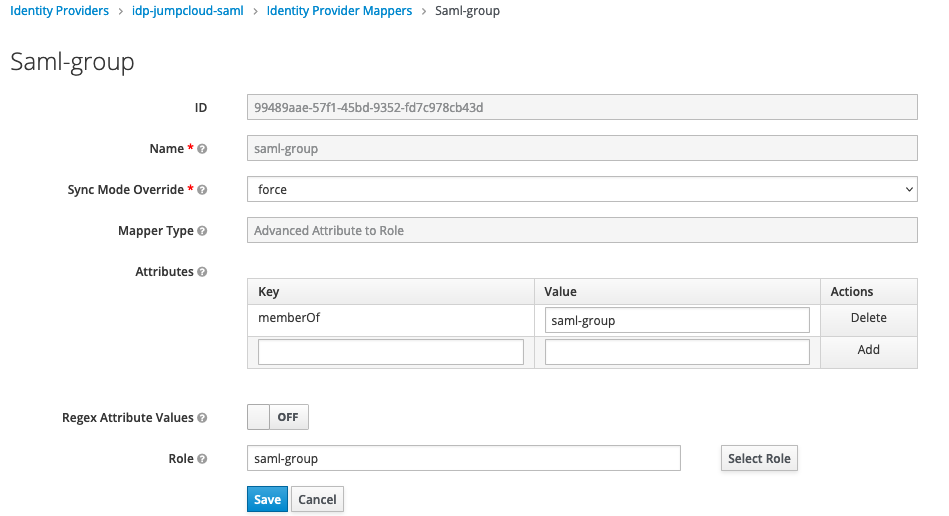
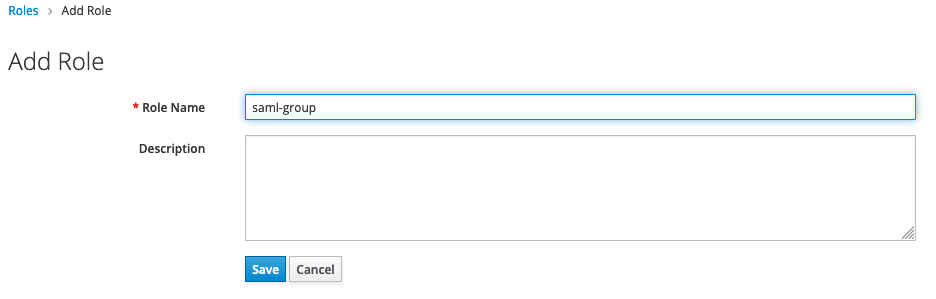
Rolesand create a new role e.g.saml-group
- Click on
Identity Providersand select the provider you created earlier (see above blog post) - Click on the
Mapperstab - Click
Create - Give it a name e.g.
saml-group - select
Sync Mode Overrrideequal toforce(this updates the groups associated with this account on every login) - Create a new
Attributesusing the JumpcloudGroup Attributesidentifier, in this casememberOfas the key and your Jumpcloud group name as the key - Set Regex Attribute Values to
On - Under Role, choose the role you created